|
Placement Strategies (also known as Nesting Strategies) determine how your jobs are arranged on the media. Depending on your needs, one Placement Strategy will probably be advantageous over another. Each strategy uses a different algorithm to provide various workflow solutions for different situations.
The primary difference between each strategy is "speed vs. media waste". Although this is not always the case, printing faster will generally produce more unused media.
 To set your Placement (Nesting) Strategy: To set your Placement (Nesting) Strategy:
- Highlight the printer you want to use, and click
 button in the [Current Media and Page Size] area. This opens the "Change Media and Page Size" dialog (Figure 1). button in the [Current Media and Page Size] area. This opens the "Change Media and Page Size" dialog (Figure 1).
- In the Placement field, use the drop-down box to select your placement strategy.
- Click
 button to modify any options for the [Placement Strategy]. This opens the "Placement Strategy" dialog (Figure 2). button to modify any options for the [Placement Strategy]. This opens the "Placement Strategy" dialog (Figure 2).
- Make your changes, and click [OK].
 Setup Options: Setup Options:
Click  button in the [Placement] field. This opens “Placement Strategy” dialog. Set your Placement Strategy Options (Figure 2 &3). button in the [Placement] field. This opens “Placement Strategy” dialog. Set your Placement Strategy Options (Figure 2 &3).
NOTE: Depending on your Placement Strategy, these options may or may not be available.
[General] Tab
The [General] tab (Figure 2) includes the following options:
- Print Triggering Manual - You can set your Print Triggering options to begin printing once certain conditions are met. [Time Based Start] requires that a certain amount of time pass before printing. [Area Based Start] requires that a certain amount of media be used before printing. If there are no selected [Print Triggering] option, printing will only begin when the [Print Now] button is clicked in RIP-Queue.
- Justification - This option determines where the image is placed on the media. If you are using a strategy that prints multiple images at the same time, the justification applies to the group of images. Use Justification icons for set your desired place (left, Center, Right).
- Offset - This option adds extra white space to the left or top of an image. If you are using a placement strategy that prints multiple images at a time, the offset applies to the group of images.
- Printing Gutter - Enabling this option will print a gutter containing each of the printer’s ink channels on the outside edge of the nest. You can also adjust the size of the gutter, and whether the gutter will print on the Left, Right, or both sides Size can be adjusted using the up and down arrows, or manually input.
- Flip every other tile - This option will flip every other tile for tiled jobs that are submitted as a single job. This option will not work for a tiled job that has been submitted as separate jobs.
[Options] Tab
The [Options] Tab (Figure 3) includes the following options:
- Space Between Copies - This option determines the amount of white space placed (Horizontal and Vertical) between the copy of images.
- Grouping - This option determines how RIP-Queue orders the tiles or copies of a job when printing. You can select [By Tiles] or [By Copies]. If you select [By Tiles], all the tiles of an image will be printed before the next copy of the image is begun. If you select [By Copies], each copy of the image will be printed before the next tile is begun. This option also allows you to group [By Tiles] and [By Copies] at the same time (Figure 4). You will see that copies are nested together and in the correct tile order.
- Rearrange Tiles to Conserve Media – This option enable when you select [Print Jobs Individually]. If you want to conserve media, check this option. Your jobs will be placed on a media as “Conserve Media” placement.
- Horizontal Copying - This option places tiles or copies of a job side-by-side across the page, instead of placing each tile or copy on its own row.
- Print all rows at a time - This option sends all rows to the printer at the same time. The rows are printed as one group when you set a placement as [Group Jobs Together]
- Nest Outline Cut Path – This option allows you to print a nest trim box when you select [Conserve Media], [Group Jobs Together], or [Print Jobs Individually] placement. When enabled a cut path is generated around the entire nest of images at print time. (NOTE: This box is named “NestTrimBox” and shows up in CUT-Server same as any other cut data.
- BestFit - This option automatically adjusts the layout of your jobs to ensure that the most media is used when you set a placement as [Conserve Media]. The [Allow Rotate] option allows RIP-Queue to automatically rotate Square Resolution images for better fit.
- Cutter Mark Darkness - This option determines the darkness of your cutter marks. Select a high value for darker marks and a low value for lighter marks.
- Percent to cache before printing - This option allows you to set when the processed information is sent to the printer. When it is set to 0 %, information is sent to the printer as fast as it is processed. When it is set to 100 %t, information is not sent to the printer until the entire print is finished processing.
- Horizontal/Vertical Cutter Marks – These options allow you to set single line or double lines of the cutter mark that will be placed on your image. Check the box of [Single] or [Double] you desire.
- Double Mark Size: - This option allows you to determine how much the thickness of the cutter line. Default setting is [2.95mm (0.118 inch)]. If you want to put the cutter mark on the edge of an image, check a box of [Image Width] option.
- Single Mark Size: - This option is set concomitant with Double Mark Size setting. If you want to put the cutter mark on the edge of an image, check a box of [Image Width] option.
- Mark Line Size: - This option is set concomitant with Double Mark Size setting. If you want to put the cutter mark on the edge of an image, check a box of [Image Width] option.
- Image Width – This option allows you to set a cut line a top and bottom of an image for printing. This option is available when you select [Futoba, Dicus or Flexa Cutter Marks].
- Space Between Image and Cutter Mark - This option determines the amount of white space placed between the image and the cutter mark when setting a [Placement] as Fotoba, Dicus or Flexa Cutter Marks.
NOTE: A Square Resolution is a resolution that has the same vertical and horizontal values. For example, 720 X 720 is a Square Resolution. 360 X 720 is an example of a non-Square Resolution.
 Placement (Nesting) Strategies: Placement (Nesting) Strategies:
You can choose to use any of the following [Placement (Nesting) Strategies] from a drop down menu (Figure 5):
- Conserve Media - This method uses a row-based system to organize images and save as much media as possible. A row is determined by the height of the largest available image. All other images in a row can be equal too, but not greater than this image. Every time a job enters RIP-Queue, the entire nest is re-arranged to better fit the new job. This method will not rotate images by default. Use [Conserve Media] if you want to save media and do not need to print jobs on a strict priority basis.
NOTE: [Conserve Media] has three different methods: Conserve Media with BestFit turned off, Conserve Media with BestFit turned on and Allow Rotate off, and Conserve Media with both BestFit and Allow Rotate turned on. Use the one that gives the best results.
- Group Jobs Together - This method places jobs side-by-side to save more media, but does not rotate or re-arrange the order of the jobs. Use [Group Jobs Together] if you want to save media and need to print on a strict priority basis.
- Print Jobs Individually - This method prints each job as it is submitted. Use [Print Jobs Individually] if you do not need to save media and need to print jobs on a strict priority basis
TIP: A new option [Generate Nest Outline Cut Path] is added to the [Conserve Media], [Group jobs Together] and [Print Jobs Individually] placement strategies (Figure 4). When enable this option, a trim box is created around the entire nest of images at print time.
- Fotoba, Dicus or Flexa Cutter Marks - This method prints your images with Fotoba, Dicus, or Flexa cutter marks. This will automatically conserve as much media as possible, but it also creates extra space around each image for the cutter marks. Use this option only if you need to print your images with Fotoba, Dicus, or Flexa cutter marks.
This option is only available for specific printers. Click an icon tab ( ) to see and interact with live bidirectional printer status such as Ink Volumes and loaded Media (Figure 6). ) to see and interact with live bidirectional printer status such as Ink Volumes and loaded Media (Figure 6).
|
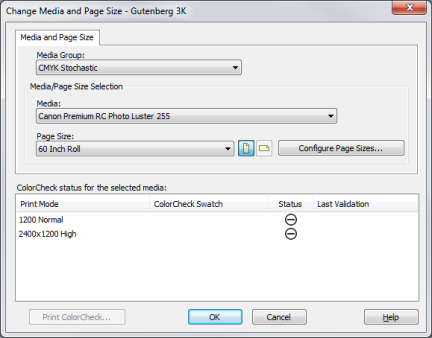
Figure 1
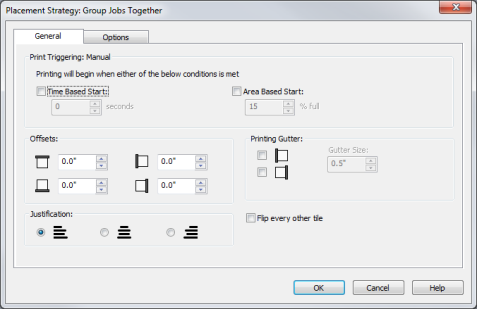
Figure 2
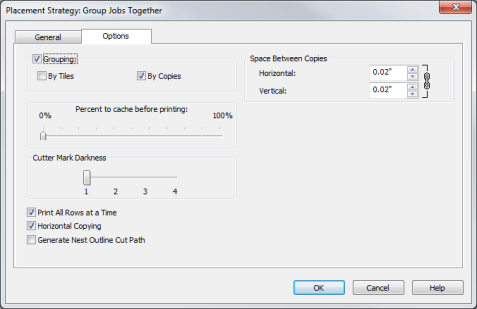
Figure 3
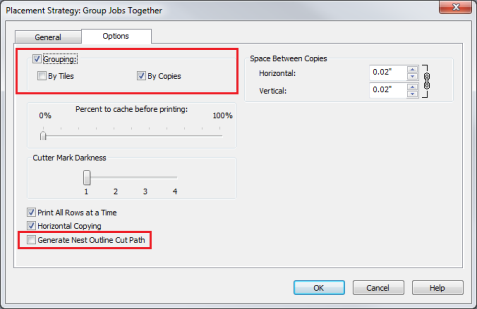
Figure 4
 Strategies_Thrive.png)
Figure 5
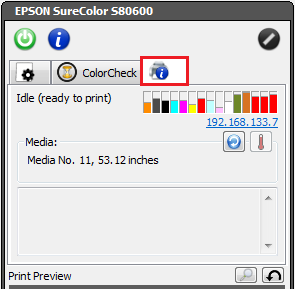
Figure 6
|


 Strategies_Thrive.png)

 To set your Placement (Nesting) Strategy:
 button in the [Current Media and Page Size] area. This opens the "Change Media and Page Size" dialog (Figure 1).
 button to modify any options for the [Placement Strategy]. This opens the "Placement Strategy" dialog (Figure 2).
 button in the [Placement] field. This opens “Placement Strategy” dialog. Set your Placement Strategy Options (Figure 2 &3).